IT0023.轻松学Java Web 开发
张昆 编著
Broadview博文视点
2013年3月出版
电子工业出版社
ISBN:9787121195587


JSP 基础篇
第1章 浏览器技术
第2章 JSP 基础
2024年03月11日 JDK 11.0.16.1 tomcat 10.1.19 测试一个简单的JSP文件成功
电脑环境变量CATALINA_BASE,CATALINA_HOME 设置为tomcat的目录,JAVA_HOME设置为JDK的目录
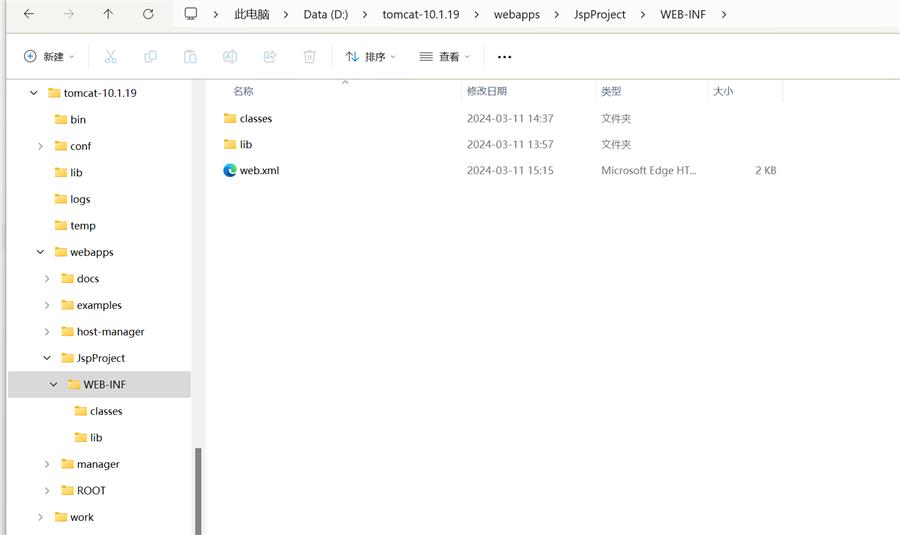
tomcat目录下的webapps目录下建立JspProject目录,再里面建立WEB-INF目录,里面有classes和lib目录,还有一个web.xml文件,web.xml文件可以从原有的webapps/example/WEB-INF里复制后删除些内容即可,里面的servelet是已经写好并生成好的一个.class, 放在classes目录下,servelet 代码见第5章

<?xml version="1.0" encoding="UTF-8"?>

<web-app xmlns="https://jakarta.ee/xml/ns/jakartaee"
  xmlns:xsi="http://www.w3.org/2001/XMLSchema-instance"
  xsi:schemaLocation="https://jakarta.ee/xml/ns/jakartaee
                      https://jakarta.ee/xml/ns/jakartaee/web-app_6_0.xsd"
  version="6.0"
  metadata-complete="true">

    <description>
      Servlet and JSP Examples.
    </description>
    <display-name>Servlet and JSP Examples</display-name>

    <request-character-encoding>UTF-8</request-character-encoding>

     <servlet>
        <servlet-name>HelloServelet</servlet-name>
        <servlet-class>HelloServelet</servlet-class>
    </servlet>
        <servlet-mapping>
        <servlet-name>HelloServelet</servlet-name>
        <url-pattern>/HelloServelet</url-pattern>
    </servlet-mapping>

    <welcome-file-list>
        <welcome-file>index.html</welcome-file>
        <welcome-file>index.xhtml</welcome-file>
        <welcome-file>index.htm</welcome-file>
        <welcome-file>index.jsp</welcome-file>
    </welcome-file-list>


    <error-page>
        <error-code>403</error-code>
        <location>/WEB-INF/jsp/403.jsp</location>
    </error-page>

</web-app>
在WEB-INF平级目录里建立index.jsp文件,用vs code建立的,编码utf-8,代码写好后进tomcat目录/bin目录下 startup.bat 启动tomcat服务, 记得先停用IIS服务, 在cmd里能看到 JspProject 部署成功 字样就说明OK了,浏览器打开 http://localhost:8080/jspproject/index.jsp 就能看到效果了
<%@ page language="java" contentType="text/html; charset=utf-8" pageEncoding="utf-8"%>
<!DOCTYPE html>
<html lang="en">
<head>
    <meta charset="UTF-8">
    <meta name="viewport" content="width=device-width, initial-scale=1.0">
    <title>Document</title>
</head>
<body>
    <h1>jsp测试页2222</h1>
    <%
        out.print("hello jsp!!!程序输出中文");
    %>
</body>
</html>
第3章 JSP 内置对象
第4章 JavaBean 基础
第5章 Servelet 编程
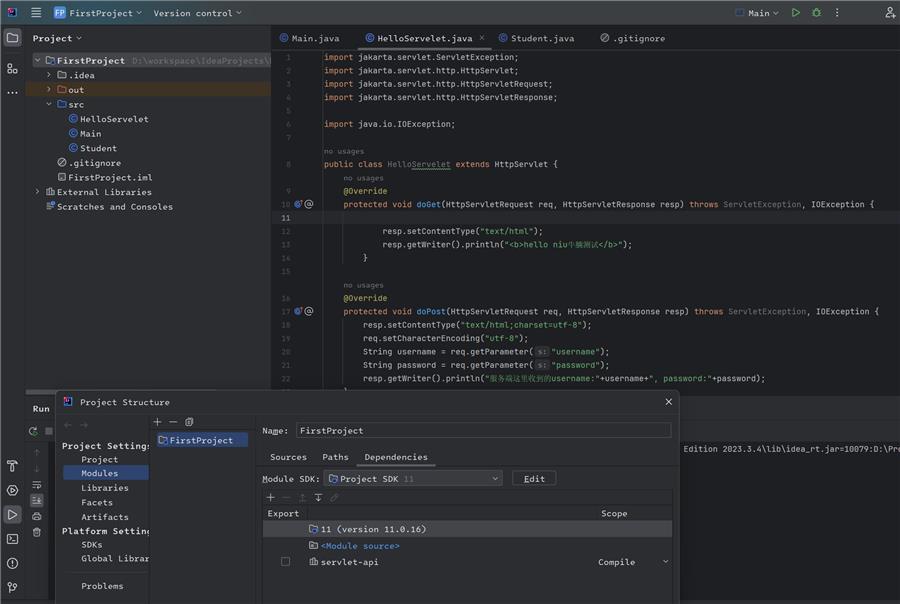
用的 IntelliJ IDEA 2023.3.4 (社区版),建立一个JAVA的项目,建立 HelloServelet 类,项目设置里引用 tomcat目录下的lib目录下的 servlet-api.jar , 代码写好后编译一下,在生成的out目录里有.class文件,复制到 tomcat/webapps/jspprojcts/WEB-INF/classes 目录下,注意如果代码里有包 package 还得在classes 目录下建立对应的包名目录,WEB-INF/web.xml 里加入相应的servelet内容,在第2章的示例代码里有了

import jakarta.servlet.ServletException;
import jakarta.servlet.http.HttpServlet;
import jakarta.servlet.http.HttpServletRequest;
import jakarta.servlet.http.HttpServletResponse;

import java.io.IOException;

public class HelloServelet extends HttpServlet {
    @Override
    protected void doGet(HttpServletRequest req, HttpServletResponse resp) throws ServletException, IOException {

            resp.setContentType("text/html");
            resp.getWriter().println("<b>hello niu牛腩测试</b>");
        }

    @Override
    protected void doPost(HttpServletRequest req, HttpServletResponse resp) throws ServletException, IOException {
        resp.setContentType("text/html;charset=utf-8");
        req.setCharacterEncoding("utf-8");
        String username = req.getParameter("username");
        String password = req.getParameter("password");
        resp.getWriter().println("服务端这里收到的username:"+username+", password:"+password);
    }
}
重新启动 tomcat , 浏览器输入 http://localhost:8080/jspproject/HelloServelet 即可看到doGet代码里的效果,在WEB-INF目录平级建立 aaa.html 文件,写个简单的表单 form post 提交到 doPost 里即可看到效果
<!DOCTYPE html>
<html lang="en">
<head>
    <meta charset="UTF-8">
    <meta name="viewport" content="width=device-width, initial-scale=1.0">
    <title>Document</title>
</head>
<body>
   <h1> jsp post 到 servelet 测试 </h1>
    <form method="post" action="/JspProject/HelloServelet">
        <div>姓名:<input type="text" name="username" /></div>
        <div>密码:<input type="password" name="password" /></div>
        <div>
            <button type="submit">提交</button>
        </div>
    </form>
</body>
</html>
第6章 用户自定义标签
第7章 EL与JSTL
Struts 2 技术篇
第8章 Struts 2 框架入门
第9章 Struts 2 配置详解
第10章 Struts 2 拦截器
第11章 Struts 2 类型转换和输入校验
第12章 国际化和文件上传
第13章 Struts 2 标签库
Hibernate 技术篇
第14章 Hibernate 框架入门
第15章 Hibernate 配置和会话
Spring 技术篇
第16章 Sprint 框架入门
第17章 控制反转
第18章 面向切面编程
S2SH 整合篇
第19章 框架技术整合开发